Those are the Ford Upfitter switches for the F250 and up. He's done a hell of a lot of plastic and fiberglass work to make that fit and finish so good.
@SlipR35 Looks great, but our Twins cubby is deeper and the switches way farther out of hand. You have to lean over and down to hit them, hence my positioning of my switch panel mocked up here:
But with @logistixs thread about moving the 4x4 switch, the kick panel by the headlight switch could be a place to locate an SPOD or a Feniex controller.
I am quite happy with my Switch Pros. The price tag is high, but the quality is worth every penny. With the surface mount, only a little modification was needed to move the USB/aux plug slightly.
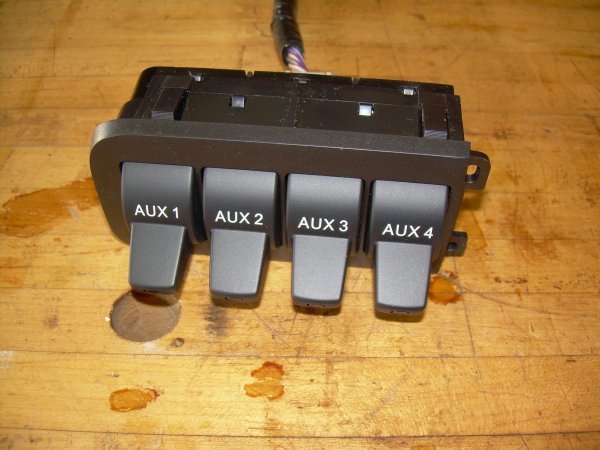
I decided to bite some style from MadSci and give the Ford upfitter switches a shot. I had to do some extra modification to keep the depressions on the sides since I do not have heated seats. I totally get MadSci not wanting to make these for people as it took FOREVER!!!
I decided to bite some style from MadSci and give the Ford upfitter switches a shot. I had to do some extra modification to keep the depressions on the sides since I do not have heated seats. I totally get MadSci not wanting to make these for people as it took FOREVER!!!
I am quite happy with my Switch Pros. The price tag is high, but the quality is worth every penny. With the surface mount, only a little modification was needed to move the USB/aux plug slightly.
I tried to fit my spod controller in that spot, but it would have caused more of a headache than I felt it was worth. Decided to just use the brake controller location
Hey Craig, I'd like to know if you ran the light for the switches to turn on with the auto light sensor and work with the dimmer switch? If so which wire did you tap into? Thanks!
I decided to bite some style from MadSci and give the Ford upfitter switches a shot. I had to do some extra modification to keep the depressions on the sides since I do not have heated seats. I totally get MadSci not wanting to make these for people as it took FOREVER!!!
Looks great, It would be nice if you laser scan it. It looks pretty good in the pic with the paint can. If you could laser scan it into a computer, you could tweek it. This looks a perfect size to 3D print. I would buy a 3D printed version for some of those switches.
Hey Craig, I'd like to know if you ran the light for the switches to turn on with the auto light sensor and work with the dimmer switch? If so which wire did you tap into? Thanks!
I did. What I did was splice into the yellow wire on the back on the headlight switch harness. This illuminates the words "AUX 1, etc." when the lights are on. The orange lights on the tips of the switched illuminate when the switches are turned on.
I did. What I did was splice into the yellow wire on the back on the headlight switch harness. This illuminates the words "AUX 1, etc." when the lights are on. The orange lights on the tips of the switched illuminate when the switches are turned on.
I am quite happy with my Switch Pros. The price tag is high, but the quality is worth every penny. With the surface mount, only a little modification was needed to move the USB/aux plug slightly.
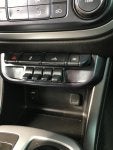
Slow and steady wins the race. I used plastic pry tools to pop off the panel that holds the seat heater buttons. There are a total of 6 clips that hold it in place. It’ll feel like the clip will break, but eventually it will pop off.
Then removing the lower panel is the easy part. Just a couple screws and it comes out.
I chose to mount my switches on the front of the panel instead of cutting it out and recessing it. Mainly because there are supports behind it and I’m lazy. Ha!
Join fellow enthusiasts to discuss modifications, troubleshooting tips, and share your experiences with these versatile midsize pickups, fostering a collaborative space for an exchange of knowledge and camaraderie among Chevy Colorado and GMC Canyon aficionados.