(continued)
Pic 5 and pic6 show detail of where the power goes through the firewall - 5 under the hood, 6 in the footwell. Wire runs under the driver's side door sill cover. Pic 7 is my install - Kenwood head plugs into two panel-mount Cat5 jacks, wires run through the console and under the back passenger seat where the radio is mounted. RAM mount holds the head in place and allows me to swivel/move/remove as needed. Under the passenger seat is a drain plug - antenna wire runs through a hole I drilled in that plug, along the bed rail and to a Breedlove stake-pocket NMO antenna mount in the right rear stake pocket.
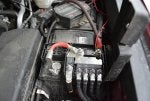
If you were going to mount a radio under the dash or in the console, then there's lots of room to put a fuse block inside (or behind) the console, and power could come straight through the firewall and over to the fuse block. I'd route the antenna wire the same if you're heading aft, or run it back through the same firewall hole as the power if you're going to use a fender mount.
Feel free to ask questions if anything isn't obvious, and please ignore the dirt - just got back from a 2 week trip and cleaning the truck hasn't made it to the top of my to-do list yet ;-)
Tom