Chevy Colorado & GMC Canyon banner

2023 Colorado Tow Hitch Receiver Installation

18K views 20 replies 10 participants last post by  ncpepperman  
#1 ·
I purchased a 2023 Colorado Trail Boss that did not come with the trailering package. While I have no immediate plans to tow anything, I purchased the receiver (part #86796043) and the Trailer Hitch Wiring Harness (part #84955755).
I’m no mechanic, but have installed parts like running boards and removed the air dam, so I’ve been looking for instructions to install the receiver.
I’m unable to find a good video or detailed instructions to install the receiver on the 2023 Colorado. If you have found one or have done it yourself, I’m certain it would be very helpful to many new owners. Thank you!

 
#2 ·
I can't give you any detailed instructions or suggestions, but you may find some on a U-Haul site or E-Trailer site. I don't think the 3rd Gen are significantly different than the 2nd Gen in this regard.

A warning: The bolts that hold the bumper and this crossmember on are tight. It took everything I could muster with an 18" breaker bar to break mine loose when I was looking to replace the bumper. Leave yourself plenty of time, have a cheater pipe available, some people swear by an impact wrench for this work.

Also, probably easier to handle with a second set of hands. Not impossible with a little ingenuity to do by one person, but easier.

I would probably rate this as a good 2-person, ice cold six pack, sort of job. Of course, you might want a second 6 pack to drink as you admire the fruits of your work.

Take pics as you do the work, probably a lot of people would like some photo information before they go where you are going.
 
  • Like
Reactions: TheOregonTrailBoss
#4 · (Edited)
word vomit but...


Tools Required
Torque wrench

13 mm and 21 mm socket

Procedure
  1. Warning:
    • Wear Safety glasses in order to avoid eye damage.
    • In order to avoid being burned, do not service the vehicle while the exhaust system is still hot. Service the vehicle when the exhaust system is cool.
  2. Remove the spare tire.
  3. Raise and suitably support the vehicle. Refer to Lifting and Jacking the Vehicle in Vehicle Service Manual.
  4. Remove the spare tire.
  5. PIC 1
  6. Remove the nut (1) and bolt (2) securing the spare tire bracket (3) to the rear bumper bar. Retain nut and bolt.
  7. PIC 2
  8. Disconnect rear bumper harness electrical connections.
  9. Remove and retain the nut (1) from the rear bumper stud (1).
  10. Remove and retain the bolts (3) securing the rear bumper bracket (4).
  11. PIC 3
  12. With the aid of an assistant, remove the rear bumper (1) from the vehicle (2).
  13. PIC 4
  14. Adjust rear bumper and tighten rear bumper bolts (1), platform assembly – trailer hitch bolts (5) and rear bumper nut. Tighten rear bumper bolts and accessory hitch bolts to 160 N.m (118 lb ft). Tighten the rear bumper nut to 58 N.m (43 lb ft).
  15. Remove and retain the bolts (1) securing the rear bumper bar.
  16. With the aid of an assistant, remove the rear bumper bar (2) from the vehicle.
  17. PIC 5
  18. Caution: Use the correct fastener in the correct location. Replacement fasteners must be the correct part number for that application. Fasteners requiring replacement or fasteners requiring the use of thread locking compound or sealant are identified in the service procedure. Do not use paints, lubricants, or corrosion inhibitors on fasteners or fastener joint surfaces unless specified. These coatings affect fastener torque and joint clamping force and may damage the fastener. Use the correct tightening sequence and specifications when installing fasteners in order to avoid damage to parts and systems.
  19. With the aid of an assistant, install the platform assembly – trailer hitch (1) to the vehicle and secure with the previously retained bolts (2).
    Note: Only hand tighten bolts at this stage in order to install and adjust rear bumper.
  20. PIC 6
  21. With the aid of an assistant, install the rear bumper (1) to the vehicle (2)
  22. PIC 7
  23. Install the previously retained bolts (1) to the rear bumper bracket (2).
    Note: Only hand tighten bolts at this stage in order to install and adjust rear bumper.
  24. Install the previously retained nut (3) to the rear bumper stud (4).
  25. Adjust rear bumper and tighten rear bumper bolts (1), platform assembly – trailer hitch bolts (5) and rear bumper nut. Tighten rear bumper bolts and accessory hitch bolts to 160 N.m (118 lb ft). Tighten the rear bumper nut to 58 N.m (43 lb ft).
  26. PIC 8
  27. Reinstall the nut (1) and bolt (2) securing the spare tire bracket (3) to the platform assembly – trailer hitch.
  28. Tighten spare tire bracket nut and bolt to 22 N.m (16 lb ft).
  29. Reinstall the spare tire.
  30. Connect rear bumper electrical connections.
  31. Install trailer wiring harness kit.
  32. Lower the vehicle.
 

Attachments

#6 ·
word vomit but...


Tools Required
Torque wrench

13 mm and 21 mm socket

Procedure
  1. Warning:
    • Wear Safety glasses in order to avoid eye damage.
    • In order to avoid being burned, do not service the vehicle while the exhaust system is still hot. Service the vehicle when the exhaust system is cool.
  2. Raise and suitably support the vehicle. Refer to Lifting and Jacking the Vehicle in Vehicle Service Manual.
  3. Remove the spare tire.

  4. Object Id: 6087180
  5. Remove the nut (1) and bolt (2) securing the spare tire bracket (3) to the rear bumper bar. Retain nut and bolt.

  6. Object Id: 6087192
  7. Disconnect rear bumper harness electrical connections.
  8. Remove and retain the nut (1) from the rear bumper stud (1).
  9. Remove and retain the bolts (3) securing the rear bumper bracket (4).

  10. Object Id: 6087181
  11. With the aid of an assistant, remove the rear bumper (1) from the vehicle (2).

  12. Object Id: 6087183

  13. Remove and retain the bolts (1) securing the rear bumper bar.
  14. With the aid of an assistant, remove the rear bumper bar (2) from the vehicle.

  15. Object Id: 6087185
  16. Caution: Use the correct fastener in the correct location. Replacement fasteners must be the correct part number for that application. Fasteners requiring replacement or fasteners requiring the use of thread locking compound or sealant are identified in the service procedure. Do not use paints, lubricants, or corrosion inhibitors on fasteners or fastener joint surfaces unless specified. These coatings affect fastener torque and joint clamping force and may damage the fastener. Use the correct tightening sequence and specifications when installing fasteners in order to avoid damage to parts and systems.
  17. With the aid of an assistant, install the platform assembly – trailer hitch (1) to the vehicle and secure with the previously retained bolts (2).
    Note: Only hand tighten bolts at this stage in order to install and adjust rear bumper.

  18. Object Id: 6087188
  19. With the aid of an assistant, install the rear bumper (1) to the vehicle (2)

  20. Object Id: 6087190
  21. Install the previously retained bolts (1) to the rear bumper bracket (2).
    Note: Only hand tighten bolts at this stage in order to install and adjust rear bumper.
  22. Install the previously retained nut (3) to the rear bumper stud (4).
  23. Adjust rear bumper and tighten rear bumper bolts (1), platform assembly – trailer hitch bolts (5) and rear bumper nut. Tighten rear bumper bolts and accessory hitch bolts to 160 N.m (118 lb ft). Tighten the rear bumper nut to 58 N.m (43 lb ft).

  24. Object Id: 6087191
  25. Reinstall the nut (1) and bolt (2) securing the spare tire bracket (3) to the platform assembly – trailer hitch.
  26. Tighten spare tire bracket nut and bolt to 22 N.m (16 lb ft).
  27. Reinstall the spare tire.
  28. Connect rear bumper electrical connections.
  29. Install trailer wiring harness kit.
  30. Lower the vehicle.
Thank you! I tried to find this on the GM site, but must have been looking in the wrong place. Big help!
 
#5 · (Edited)
are you trying to install it on the front or rear of the truck?
 
owns 2016 Chevy Colorado Z71
#8 ·
I am replacing the "bumper" hitch on the rear with this so I can increase the tow capacity and not destroy my bumper in order to tow something.

It appears there were pictures in your post that did not transfer over when you pasted the instruction. Do you think those would be useful or should the step-by-step instructions be sufficient? Thanks again for posting that.
 
#7 ·
I have access to it thru work idk if you would have found it normally, but I hope that helps you. i didnt get the wiring since its "aftermarket" the wiring would be "different"
 
owns 2016 Chevy Colorado Z71
#9 ·
The pictures that may not have sent are hyperlinked to GM so I had to break that to send. It should be enough information for you to install the hitch… I’ll try later to fix the pics that couldn’t be sent properly
 
owns 2016 Chevy Colorado Z71
#10 · (Edited)
NOW you should be able to see the pictures. i couldnt set it up the way GM does but i labeled each picture 1-8 and edited the procedure to show the correct order of the photos. best i can do at this time


Okay NOW i hope that will help you out @TheOregonTrailBoss
 
owns 2016 Chevy Colorado Z71
  • Like
Reactions: ncpepperman
#11 ·
NOW you should be able to see the pictures. i count set it up the way GM does but i labeled each picture 1-8 and edited the procedure to show the correct order of the photos. best i can do at this time


Okay NOW i hope that will help you out @TheOregonTrailBoss
You’ve been a lot of help! I imagine it will help several people looking for these directions if their Colorado didn’t come with the trailering package. I really appreciate you taking the time to provide this info.
 
#12 ·
do me a favor take pics as you go and post them for me
 
owns 2016 Chevy Colorado Z71
  • Like
Reactions: TheOregonTrailBoss
#13 · (Edited)
Well today I installed the hitch I ordered from the Chevrolet app. It’s listed as 3,500-lb.-Capacity Hitch Trailering Package GM Part # 86796043.
As I’ve seen posted on other threads, the part sticker shows a towing capacity of 7,700 lbs so I’m confident this part provides the maximum trailering capacity the truck allows.

First I’d like to give a big thanks to @Raptor22 for the details and pictures! While the part does come with instructions, the pictures are black and white and less clear so I was happy to have them available on my phone as I went step by step.


There are a total of 11 bolts to remove and replace. Contrary to the instructions you will need a 15mm (not 13mm) and 21mm deep socket wrench with a 1/2in connection. Do not attempt to use SAE (inches) sockets as the will not work for all of the bolts.

I did this all alone without raising the truck and don’t recommend it. Especially once you’re ready to remove the old bumper/hitch receiver and then bring in the new receiver, an extra set of hands would have been nice.

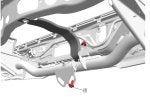
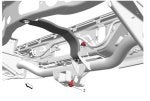
After removing the spare tire (see owner’s manual) the first bolt to remove is the spare tire brace using the 15mm socket.

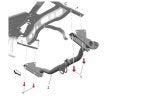
Using the 15mm deep socket, removing the bumper stud on both sides. This nut has a long bolt so you will not be able to do it without a deep socket and you’ll be using small cranks due to very little room.

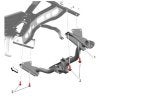
Remove the bumper bracket bolts on both sides using the 21mm socket. It doesn’t require a deep socket, but using one gives more room. Again you’re in a tight space and don’t get to make big cranks with the wrench.

You can now remove the bumper. I didn’t because I am not smart enough to figure out the wiring connections so I went to the next step.

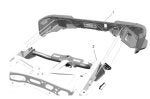
To remove the bumper bar bolts, use a 21mm socket with a torque wrench or breaker bar. These suckers are tight!
Once you remove them be careful removing the bumper bar. If you’re like me and didn’t disconnect the bumper, it will hang from the wiring, putting them as risk of being ripped off. I used stacked 5 gallon buckets on each side to hold the bumper up while I struggled and cursed at the new receiver as I attempted to secure it.
I’m sorry I don’t have photos here, I was exhausted and in a poor mood attempting to get the new receiver settled in place, around the bumper, under the spare tire bracket, and getting a bolt secured on each side before getting myself out of a very awkward position…

Once I got a bolt in on each side I tightened them about 75% of the way and made sure to align the bumper bracket bolts into place before screwing all other bolts/nuts in their place, again 75% themselves. With all in place and the bumper wiring all free from being smashed, I fully tightened the main bumper bar bolts, followed by the bumper bracket bolts, bumper stud and finally the spare tire bracket.


I don’t remember how much space there was between the bumper and the vehicle before, but there is a clear gap now and I wonder if it’s due to a slight difference in clearance between the bumper bar and the hitch receiver.


In the end I would suggest paying Chevy the listed $150 to install this part if you don’t have the tools, knowledge, or assistance necessary to do it right. I had to pay half that to get the MM sockets as I only had SAE on hand. I also may have damaged a wire due to letting the bumper hang and it could have been worse.

If you take this on yourself follow Raptor’s instructions and, while it’s possible, please try to avoid doing it alone. Good luck!
 
#14 ·
well to be fair i, as a GM tech have to deal with kinda crappy black and white pictures for the repairs and stuff i do. those are GM taken images. as far as the bolt sizes, SI isnt always accurate. youd be surprised how much stuff is wrong or irrelevant to a repair hahah. and yeah it does say you need an assistant at one point for the install. im glad i helped albeit limitedly.
 
owns 2016 Chevy Colorado Z71
#15 ·
I just installed a hitch on my 2023 GMC Canyon, same part number as 2022 Canyon, spare tire bracket needed “a little massaging”, use 2022 instructions - they’re all over online, same 8 bolts, 4 on each side, PS - I ordered mine without on purpose, it was $815 extra!!!, they package it with some trailering app. & trailer brake, I didn’t need all that
 
#17 ·
At least you got yours complete. I do not have the square part in mine but all the rest of the hitch is there,. wireing , harness . break control just not where the hitch goes into. trying to get gm to send out the part or the dealer says they would have to send the hole assemebly again .. must has been missed when the truck was made. crazy
 
#19 ·
for the harness you have to take it to the dealership . reason is that they have to reset the computer and add in the code for the new system to see the harness . if you have uhaul or you do it yourself you will get all kinds of errors. I tried to do it and ran into it and that is when I was told the part about the dealership has to install it. was a little pain but only cost me 50 for them to do it.
 
#20 ·
What kind of error codes did you get ?
I had u haul install mine , and before I got it installed had some codes come up, stopped by a dealer , they couldn’t find anything , then on way home after install had a lot of codes , has been in the Chevy dealership for 4 days now and they can figure out what’s going on with it , last time it had 110 codes pop up , just wondering is I should be having them look more into this , but like I said first set of codes came up before the install so not sure what’s going on nor does the dealer so far , there waiting to hear back from a engineer