I got off early today from work, and decided to tackle installing my HomeLink system. Here is my installation walk-through.
NOTE: I'm not a professional or even an expert..........just an average guy that likes to tinker. Therefore any damage you do to your vehicle by following my guide, is not my responsibility.
What you need:
1. HomeLink system: you can find used ones on Ebay, but I got a new BrandMotion system from here: BrandMotion 20004102 Homelink kit tan bezel - SavingLots.com If you have modern door openers, be sure to get a module that has the rolling codes. The reason that I went with the new BrandMotion system, is that I have 3 garage openers with the oldest over 20 years old and the newest less than a year old, and I wanted a system that I was sure would work will all 3. Some of the Ebay systems may not work with the latest openers. Be sure to look for ones that have an amber light (not red which is the older version). I used the Tan colored face plate. It is an OK match, but not exact. It is a little darker tan color than the headliner material. The gray color may work as well.
2. Small putty knife to pry the edge of the overhead console, or plastic panel tool, or possibly plastic ice scraping tool would work
3. Trox/Star driver (I think I used a size 10, but I forgot to check the size)
4. Wire cutters/strippers
5. Electrical tape
6. Xacto knife
7. A 12 volt circuit probe (unless you want to trust my install).
8. A drop light or light system to help you see
9. Wire taps (unless you use the BrandMotion's system, which includes them)
10. Small flat screw driver
11. A cold beer icing in the fridge for the celebration when you complete the installation successfully.
Here is a link to the BrandMotion Installation Instructions: http://www.brandmotion.com/docs/2000-4100II1.pdf Note that I follow a different sequence than shown in these instructions.
Here is what you get with the BrandMotion system. You have a choice of Black, Grey, or Tan face plate covers:
![Image]()
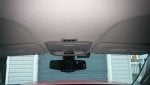
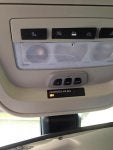
Step 1: Removing the overhead console
Good news is that the overhead console is only held on by 4 clips: 2 in the front and 2 in the back corners. I used a small putty knife to pry down one edge of the console in the rear. You could use something else like a panel tool, or maybe even an ice scraper. You just need to get one corner down far enough to get your fingers over the edge. Once you get it down enough to get your fingers of the other hand in there pull down with your fingers and the clip in that corner will pop loose. continue around with your fingers only and you can pop out the other rear clip. The front clips should easily come out at this point.
![Image]()
You may note that the lens cover for the dome lights is not on the console. You do not have to remove the lens cover to remove the console. I had it off to install some LEDs in this photo.
Now you have the console down and hanging by the 2 wiring harnesses:
![Image]()
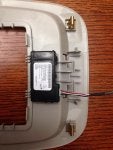
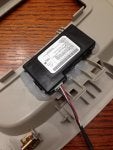
Step 2: Unplug the rear wiring harness
If you don't want to leave the console hanging or if you intend to use "ignition on" power for your HomeLink (see below), you can also unplug the front harness which is the Passenger Air Bag harness. The console is pretty light, so I don't think you will do any damage to let it hang by this harness.
![Image]()
Note there are 6 wires on my harness. On some harness there may only be 4 wires, depending on what model vehicle you have. So don't panic if you don't have 6 wires.
Here is a wiring diagram for the harness:
![Image]()
I used 3 wires for my install: White with Gray stripe, Yellow, and Black.
NOTE: I know that some of you guys are concerned about having a door opener that will basically be on whenever the vehicle door is opened, for security reasons. Thinking that someone could break into your truck and open your garage door. I park my vehicle inside 99% of the time, and I figure that even if I left it outside that if someone was willing to risk a car alarm going off breaking into my truck, they would probably be willing to break a window or a door to get in my house anyhow. If this bothers you, you will need to look for wiring that only operates when the ignition switch is turned. None of the wires on the dome light harness meet that requirement. I believe that a wire on the Passenger Air Bag harness color coded VT/WH is an "ignition on" wire that would be what you are looking for. However I did not test it myself.
If any of you guys would like to explore the other harness for a possible "ignition on" power source, I've included the wiring diagram here:
![Image]()
There is also the possibility of using the OnStar wiring in the mirror, but I didn't try to access it.
Note that the White wire with the Gray or Brown stripe is the inadvertent power supply. If my understanding is correct this wire has 12 volt power until around 10 minutes after you leave the vehicle, and then the computer cuts power to conserve the battery. This prevents you from running the battery down in case you forget and leave one of the overhead reading lights on. I use this wire to power the actual HomeLink module for when you push a button.
The Yellow wire controls the dimming module. Basically this wire carries power as soon as you open the door to the car until what ever time you have set for the lights to dim once you leave the vehicle. On my vehicle I have this set for 30 seconds, so when I get out of the truck my headlights stay on for 30 seconds then go out. This wire follows that system, and when your headlight go out, this line also loses power. I use this wire to power the LED back-lights on the module.
The Black wire is ground.
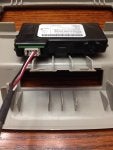
Step 3: Program and Test your HomeLink system.
Before you start cutting holes in your headliner, I recommend that you make sure you have a working system. Here is how to test and program it now: Take the HomeLink module and twist the white and red wires together, and put them into the hole in the end of the harness corresponding to the White/Grey wire. Put the black ground wire into the hole in the harness corresponding to the black ground wire on the harness. You may need to tape these in place. The white background LEDs on the HomeLink should light up. You may need to open the drivers door, or turn the key to accessory position if you have been sitting in the car for a while.
![Image]()
Press and hold a button on the HomeLink module at the same time you press and hold the garage door opener you want to program to that button. Hold the garage door opener a few inches away from the HomeLink module. You do not have to install the face plate to do this, you can just press the button with the end of a screwdriver. The amber light on the module will either flash or hold steady once it is programmed. Test the button on the HomeLink module to be sure it operates the door. Move on to the next button with the next opener, and repeat until you have them all programmed. I noted that the opener with the rolling codes took a longer button hold to program. If your system will not program with the remote, do not give up. Some systems require additional steps. Here is the BrandMotion programming guide: http://www.brandmotion.com/docs/2000-4100PI1.pdf
Step 4: Remove the 3 screws holding the headliner up
The first 2 screws are directly above the console that you removed. I believe that they are a #10 trox/star size.
![Image]()
The third screw is under the visor clip on the drivers side. I didn't remove the one on the passenger side. Pry out the plastic door on the clip with a small flat screwdriver first:
![Image]()
Now use your Trox/Star driver to remove the screw, which is the same size as the other 2.
![Image]()
Now the headliner should pull down enough for you to get a hand into the HomeLink installation area.
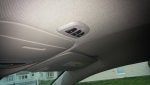
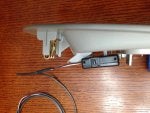
Step 5: Feel Around (don't you wish your wife/girlfriend would tell you that more often)
You need to feel the area on the back side of the headliner where you intend to install the module. Keep in mind the width of the module. There is an indentation in the headliner where the visor goes, so the front edge of the module cannot go past this and still sit flat.
NOTE: On my truck there is a wire bundle attached to the top of the headliner running front to back in the area where my finger is in this photo. It was approximately 4 1/2" from the edge of the cut out for the console. You need to avoid this area for the install, and you will need to move the module over far enough that it doesn't hit or try to lay on top of this wire bundle.
![Image]()
I moved my installation over a little so it was right beside the overhead microphone. This is a good area for the installation and avoided the wire harness on the headliner on my truck. The location of this wire harness may vary, so be sure to check it on your vehicle. If you have one of the Ebay units, some of them have very long modules, which will require you to move the installation area towards the back of the truck more in order for it to lay flat, due to the indent in the headliner for the visor.
Step 6: Mark the location for the cutout in the headliner:
If you have the BrandMotion system it comes with a template to use. If you got a system off Ebay, you may need to make your own template. Basically, you need room for the clips that attach the face plate to the module and the buttons.
This is one of those steps that you want to measure twice and cut once.
![Image]()
Step 7: Cut the hole in the headliner:
Take a deep breath. Yea you are about to cut a hole in your brand new very expensive trucks headliner, but remember, you only live once. The headliner cuts easily with a sharp Xacto knife.
![Image]()
![Image]()
The headliner in this area on my truck was about exactly 1/4" thick which is the perfect depth to work with the HomeLink. If your liner is thinner, you may have to add the foam shims that come with the BandMotion system, or make some shims if you have an Ebay module. If your headliner is thicker than 1/4" you may have to thin the inside of the headliner, which I predict will be a total PITA, so hopefully all the liners are the same thickness. My system fit perfectly with no extra work.
Step 8: Snap the face plate onto the module:
You will need snake your hand in over the headliner to hold the module while you push up on the face plate until it snaps into place.
![Image]()
Step 9: Tap the wires:
I chose a spot about 1/2 up from the wiring harness to where the wires split for a spot to do the tap. Srtip off the cloth tape over the wires and tap the White/Grey, Yellow, and Black wires if you are following my guide. I really like the taps that came with the BrandMotion system, they are very easy to use and take up little space. Other tap systems are available, but I recommend these. They are called Posi-Lock taps or connectors.
![Image]()
![Image]()
Step 10: Connect the wires from the module to the taps:
![Image]()
My system had a about 6 feet of wire, so I shortened it so I had just enough slack at the end to allow the console to hang down OK if I need to remove it in the future. I wrapped the taps and the wires in electrical tape to prevent rattling. Note that the wire harness from the module had an extra green wire that is not used.
I connected:
a. Red wire from module to White/Grey wire on harness
b. White wire from module to Yellow wire on harness
c. Black wire from module to Black wire on harness
Step 11: Test the system
Step 11b: Eliminate headliner flex:
Thanks to Moonshine, I'm adding this additional step. After installing the system, there was too much flex in the headliner when you push the buttons. The system comes with some pads to add to the top of the module to prevent this, but on my mount location, they did not come close to the roof. The solution was to cut a section of pool noodle (for my install location it required a section of noodle about 2" thick to reach from the top of the module to the roof with a good snug fit). I put a little hot melt glue on the top of the noodle to keep it from moving around then put it in place over the Homelink module. This eliminates the headliner flex when you push the buttons..............thanks Moonshine for this solution.
Step 12: Put it all back together:
a. Plug the wiring harnesses back into the console
b. Put the 3 screws back that hold up the headliner
c. Snap the console back in place
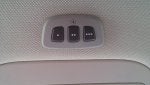
Completed Installation:
![Image]()
![Image]()
The shadowing and angle and the fact that I didn't have the visor clipped in place when I took these photos make the HomeLink face plate look cockeyed, but it is actually straight, and looks good in the vehicle.
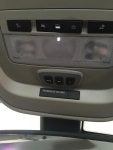
Showing Back Lighting:
![Image]()
Step 13: Drink cold beer, and pat yourself on the back for a job well done.
NOTE: I'm not a professional or even an expert..........just an average guy that likes to tinker. Therefore any damage you do to your vehicle by following my guide, is not my responsibility.
What you need:
1. HomeLink system: you can find used ones on Ebay, but I got a new BrandMotion system from here: BrandMotion 20004102 Homelink kit tan bezel - SavingLots.com If you have modern door openers, be sure to get a module that has the rolling codes. The reason that I went with the new BrandMotion system, is that I have 3 garage openers with the oldest over 20 years old and the newest less than a year old, and I wanted a system that I was sure would work will all 3. Some of the Ebay systems may not work with the latest openers. Be sure to look for ones that have an amber light (not red which is the older version). I used the Tan colored face plate. It is an OK match, but not exact. It is a little darker tan color than the headliner material. The gray color may work as well.
2. Small putty knife to pry the edge of the overhead console, or plastic panel tool, or possibly plastic ice scraping tool would work
3. Trox/Star driver (I think I used a size 10, but I forgot to check the size)
4. Wire cutters/strippers
5. Electrical tape
6. Xacto knife
7. A 12 volt circuit probe (unless you want to trust my install).
8. A drop light or light system to help you see
9. Wire taps (unless you use the BrandMotion's system, which includes them)
10. Small flat screw driver
11. A cold beer icing in the fridge for the celebration when you complete the installation successfully.
Here is a link to the BrandMotion Installation Instructions: http://www.brandmotion.com/docs/2000-4100II1.pdf Note that I follow a different sequence than shown in these instructions.
Here is what you get with the BrandMotion system. You have a choice of Black, Grey, or Tan face plate covers:

Step 1: Removing the overhead console
Good news is that the overhead console is only held on by 4 clips: 2 in the front and 2 in the back corners. I used a small putty knife to pry down one edge of the console in the rear. You could use something else like a panel tool, or maybe even an ice scraper. You just need to get one corner down far enough to get your fingers over the edge. Once you get it down enough to get your fingers of the other hand in there pull down with your fingers and the clip in that corner will pop loose. continue around with your fingers only and you can pop out the other rear clip. The front clips should easily come out at this point.

You may note that the lens cover for the dome lights is not on the console. You do not have to remove the lens cover to remove the console. I had it off to install some LEDs in this photo.
Now you have the console down and hanging by the 2 wiring harnesses:

Step 2: Unplug the rear wiring harness
If you don't want to leave the console hanging or if you intend to use "ignition on" power for your HomeLink (see below), you can also unplug the front harness which is the Passenger Air Bag harness. The console is pretty light, so I don't think you will do any damage to let it hang by this harness.

Note there are 6 wires on my harness. On some harness there may only be 4 wires, depending on what model vehicle you have. So don't panic if you don't have 6 wires.
Here is a wiring diagram for the harness:

I used 3 wires for my install: White with Gray stripe, Yellow, and Black.
NOTE: I know that some of you guys are concerned about having a door opener that will basically be on whenever the vehicle door is opened, for security reasons. Thinking that someone could break into your truck and open your garage door. I park my vehicle inside 99% of the time, and I figure that even if I left it outside that if someone was willing to risk a car alarm going off breaking into my truck, they would probably be willing to break a window or a door to get in my house anyhow. If this bothers you, you will need to look for wiring that only operates when the ignition switch is turned. None of the wires on the dome light harness meet that requirement. I believe that a wire on the Passenger Air Bag harness color coded VT/WH is an "ignition on" wire that would be what you are looking for. However I did not test it myself.
If any of you guys would like to explore the other harness for a possible "ignition on" power source, I've included the wiring diagram here:

There is also the possibility of using the OnStar wiring in the mirror, but I didn't try to access it.
Note that the White wire with the Gray or Brown stripe is the inadvertent power supply. If my understanding is correct this wire has 12 volt power until around 10 minutes after you leave the vehicle, and then the computer cuts power to conserve the battery. This prevents you from running the battery down in case you forget and leave one of the overhead reading lights on. I use this wire to power the actual HomeLink module for when you push a button.
The Yellow wire controls the dimming module. Basically this wire carries power as soon as you open the door to the car until what ever time you have set for the lights to dim once you leave the vehicle. On my vehicle I have this set for 30 seconds, so when I get out of the truck my headlights stay on for 30 seconds then go out. This wire follows that system, and when your headlight go out, this line also loses power. I use this wire to power the LED back-lights on the module.
The Black wire is ground.
Step 3: Program and Test your HomeLink system.
Before you start cutting holes in your headliner, I recommend that you make sure you have a working system. Here is how to test and program it now: Take the HomeLink module and twist the white and red wires together, and put them into the hole in the end of the harness corresponding to the White/Grey wire. Put the black ground wire into the hole in the harness corresponding to the black ground wire on the harness. You may need to tape these in place. The white background LEDs on the HomeLink should light up. You may need to open the drivers door, or turn the key to accessory position if you have been sitting in the car for a while.

Press and hold a button on the HomeLink module at the same time you press and hold the garage door opener you want to program to that button. Hold the garage door opener a few inches away from the HomeLink module. You do not have to install the face plate to do this, you can just press the button with the end of a screwdriver. The amber light on the module will either flash or hold steady once it is programmed. Test the button on the HomeLink module to be sure it operates the door. Move on to the next button with the next opener, and repeat until you have them all programmed. I noted that the opener with the rolling codes took a longer button hold to program. If your system will not program with the remote, do not give up. Some systems require additional steps. Here is the BrandMotion programming guide: http://www.brandmotion.com/docs/2000-4100PI1.pdf
Step 4: Remove the 3 screws holding the headliner up
The first 2 screws are directly above the console that you removed. I believe that they are a #10 trox/star size.

The third screw is under the visor clip on the drivers side. I didn't remove the one on the passenger side. Pry out the plastic door on the clip with a small flat screwdriver first:

Now use your Trox/Star driver to remove the screw, which is the same size as the other 2.

Now the headliner should pull down enough for you to get a hand into the HomeLink installation area.
Step 5: Feel Around (don't you wish your wife/girlfriend would tell you that more often)
You need to feel the area on the back side of the headliner where you intend to install the module. Keep in mind the width of the module. There is an indentation in the headliner where the visor goes, so the front edge of the module cannot go past this and still sit flat.
NOTE: On my truck there is a wire bundle attached to the top of the headliner running front to back in the area where my finger is in this photo. It was approximately 4 1/2" from the edge of the cut out for the console. You need to avoid this area for the install, and you will need to move the module over far enough that it doesn't hit or try to lay on top of this wire bundle.

I moved my installation over a little so it was right beside the overhead microphone. This is a good area for the installation and avoided the wire harness on the headliner on my truck. The location of this wire harness may vary, so be sure to check it on your vehicle. If you have one of the Ebay units, some of them have very long modules, which will require you to move the installation area towards the back of the truck more in order for it to lay flat, due to the indent in the headliner for the visor.
Step 6: Mark the location for the cutout in the headliner:
If you have the BrandMotion system it comes with a template to use. If you got a system off Ebay, you may need to make your own template. Basically, you need room for the clips that attach the face plate to the module and the buttons.
This is one of those steps that you want to measure twice and cut once.

Step 7: Cut the hole in the headliner:
Take a deep breath. Yea you are about to cut a hole in your brand new very expensive trucks headliner, but remember, you only live once. The headliner cuts easily with a sharp Xacto knife.


The headliner in this area on my truck was about exactly 1/4" thick which is the perfect depth to work with the HomeLink. If your liner is thinner, you may have to add the foam shims that come with the BandMotion system, or make some shims if you have an Ebay module. If your headliner is thicker than 1/4" you may have to thin the inside of the headliner, which I predict will be a total PITA, so hopefully all the liners are the same thickness. My system fit perfectly with no extra work.
Step 8: Snap the face plate onto the module:
You will need snake your hand in over the headliner to hold the module while you push up on the face plate until it snaps into place.

Step 9: Tap the wires:
I chose a spot about 1/2 up from the wiring harness to where the wires split for a spot to do the tap. Srtip off the cloth tape over the wires and tap the White/Grey, Yellow, and Black wires if you are following my guide. I really like the taps that came with the BrandMotion system, they are very easy to use and take up little space. Other tap systems are available, but I recommend these. They are called Posi-Lock taps or connectors.


Step 10: Connect the wires from the module to the taps:

My system had a about 6 feet of wire, so I shortened it so I had just enough slack at the end to allow the console to hang down OK if I need to remove it in the future. I wrapped the taps and the wires in electrical tape to prevent rattling. Note that the wire harness from the module had an extra green wire that is not used.
I connected:
a. Red wire from module to White/Grey wire on harness
b. White wire from module to Yellow wire on harness
c. Black wire from module to Black wire on harness
Step 11: Test the system
Step 11b: Eliminate headliner flex:
Thanks to Moonshine, I'm adding this additional step. After installing the system, there was too much flex in the headliner when you push the buttons. The system comes with some pads to add to the top of the module to prevent this, but on my mount location, they did not come close to the roof. The solution was to cut a section of pool noodle (for my install location it required a section of noodle about 2" thick to reach from the top of the module to the roof with a good snug fit). I put a little hot melt glue on the top of the noodle to keep it from moving around then put it in place over the Homelink module. This eliminates the headliner flex when you push the buttons..............thanks Moonshine for this solution.
Step 12: Put it all back together:
a. Plug the wiring harnesses back into the console
b. Put the 3 screws back that hold up the headliner
c. Snap the console back in place
Completed Installation:


The shadowing and angle and the fact that I didn't have the visor clipped in place when I took these photos make the HomeLink face plate look cockeyed, but it is actually straight, and looks good in the vehicle.
Showing Back Lighting:

Step 13: Drink cold beer, and pat yourself on the back for a job well done.
")