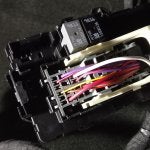
Chevy Colorado & GMC Canyon banner
41 - 52 of 52 Posts
Really!!!!
Heated steering wheels, why??
And then 2 posters explaining how, from Georgia and Texas!!!! It's not COLD!!
You're absolutely right. I live in Minnesota which is having blizzard warnings today and its nice to preheat the wheel. But the main reason I did it and maybe some others as well, is that its an easy mod to make on our trucks. I love being able to work on a new truck and make it better with each modification. For me its a hobby just the same as working on my older collector cars.
 
Update

Snoddad - yes, mine is a 2018 ZR2 Gasoline powered. To verify if you have a 3 post airbag, turn your steering wheel upside down.... and just where the wheel meets the column, you can feel the "3rd post"...

JWeigel - yes, 2018 ZR2.


This is what I ordered from Tasco Parts:


Part Number Part Name Price Quantity
84488341 Wheel $203.18 1
84235700 Coil $66.69 1
19301767 Wire $13.86 1
19329758 Wire $5.88 1

Now, on the X2 wiring (19301767) , they sent me a 5 pack of the pins/wires... so I have 4 left if anyone wants one. PM me your address, and I'll put it in the mail to you.
Like others here, we're glad to help out and share what we know. That's a good picture of Dale. He was my guy I always picked to win! The day he died, I started losing interest in NASCAR.
Hi, just an update:....Thanks richzr2 for the wire and both of you guys Rich and G92Z28 for your support. I ordered the other wire from Tasca and should arrive tomorrow, 3-13-19 and plan on doing the fuse box jumper first, then after my IRS refund I plan on phase II, the steering wheel/clock spring. I'll post an update on that when complete or if I have any questions on the jumper I will PM one of you, but it should be pretty straight forward. Thanks!
 
  • Like
Reactions: G92Z28
Update !!!

Hello again.....Just completed phase I of my project. So far so good. In pic 1 is the X2 wire n place and pic 2 is the X203 wire in place, which I secured it to the harness(loom) with a zip tie. The X2 wire is seen in image 2 in the upper left corner. I will post another update after the wheel install, though it might be a few weeks. I know it may seem a bit redundant but more pics at different viewpoints might be beneficial to future members doing this modification.
 

Attachments

  • Like
Reactions: G92Z28
Hello again.....Just completed phase I of my project. So far so good. In pic 1 is the X2 wire n place and pic 2 is the X203 wire in place, which I secured it to the harness(loom) with a zip tie. The X2 wire is seen in image 2 in the upper left corner. I will post another update after the wheel install, though it might be a few weeks. I know it may seem a bit redundant but more pics at different viewpoints might be beneficial to future members doing this modification.
You just completed the most difficult phase. I had a little trouble doing this part. I ended up having to do it twice before the connectors would "click" into pace. The rest of the swap is a breeze, just remove and replace. Good job.
 
I am not sure why a Z71 would have the wiring in place and the ZR2 does not but it is definitely a worth while mod. I have had my heated wheel since last fall and I love it.
Jerry455 you were one the pioneers who made it possible! I thank you and the others who made this work. Its sure nice to have in our snow and ice covered states.
 
You just completed the most difficult phase. I had a little trouble doing this part. I ended up having to do it twice before the connectors would "click" into pace. The rest of the swap is a breeze, just remove and replace. Good job.
Just a quick update...We received our tax refund and I ordered my wheel and clockspring from Tasca. It's on a backorder or something but should get it in 7 to 10 days. I'll post again after the install with pics....Thanks !
 
  • Like
Reactions: G92Z28
I put a wire in an envelope w/ your name and address...and a stamp. Should be in your hands in a couple days. I've got 3 of the X2 wires left.
You just completed the most difficult phase. I had a little trouble doing this part. I ended up having to do it twice before the connectors would "click" into pace. The rest of the swap is a breeze, just remove and replace. Good job.
Just a quick update...We received our tax refund and I ordered my wheel and clockspring from Tasca. It's on a backorder or something but should get it in 7 to 10 days. I'll post again after the install with pics....Thanks !
Hi Everyone... This will be my final post on my project as it is complete. I want to thank EVERYBODY in this thread for ALL of your help, support and advise, I couldn't have done it without you. Just some thoughts....clockspring is made in China...oh well, wheel, is made in Mexico, I'm ok with that. One thing I noticed is that the new wheel leather seems to be different than the one that came with the truck...a more flat finish or something like that, not as glossy,.... can't pick the words I want to use to describe. I almost like the feel of the other one better but I supposed I'll get used to it....no choice in the matter. She heats up great. Anyway thanks again!!!
 

Attachments

  • Like
Reactions: G92Z28
Weeks ago I ordered the X2 and X203 connectors (came attached to short wire leads), thinking "maybe I'll do this". Today I decided to tackle the wiring phase of the swap and was able to get the X2 connector seated in the connector body, but had a heck of a time with getting the X203's locking bar to release. It just wouldn't come up enough to allow the connector to fully seat in the connector. Then as I removing the wire from the connector cavity, the actual connector snapped in half. So, I just connected the x203 end of my jumper wire to the other side of the x203 connector body that's already wired from the factory. Buttoned everything up in the passenger footwell area, turned the key and now I have keyed/switch power at the plug mounted to the steering column. Ordering the wheel and clock spring tomorrow.
 
41 - 52 of 52 Posts