Chevy Colorado & GMC Canyon banner

2018 ZR2 Heated Steering Wheel Wiring

29K views 51 replies 18 participants last post by  bochnak  
#1 · (Edited)
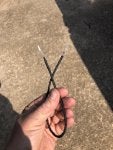
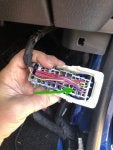
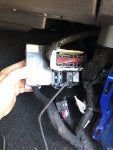
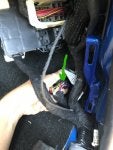
Here is how I wired the Heated Steering Wheel in my 2018 ZR2. You need to make and install a jumper wire between Connector X2 Slot #15 on the back fo the Fuse Block to Connector X203 Slot #12. The connectors are within 8 inches of each other so its a really short wire.

Making the jumper wire is the tricky part. I had installed the Factory Sport Bar that came with wiring harness for Brake Light. There are two terminals inside engine compartment on the included Sport Bar Harness. 1 terminal is used for Colorado's and 1terminal is used for Full Size trucks. I cut off the lead and terminal that was for the full sized trucks and not being used . That terminal fits PERFECT in The X2 connector. Now .. the X203 connector was a pain. I found an old terminal in my tool box .. no idea where it was from but it was small and female (both ends of jumper will be female as shown in first pic.).

The terminal I found was slightly too big so I took a small drill bit and carefully enlarged hole #12 in the X203 connector until I could slide the terminal in. Its being held in just by friction and male pin. I also jammed the end of a broken wooden toothpick in for safe measure. If somebody could find the tiny connector part # on the X203 connector .. it would make make the install even easier.
 

Attachments

#5 ·
The steering wheel has to turned on each time you want it on. It is not automatic like seats. It has no connection to BCM. 2019 the Colorado has optional heated wheel. The Canyon had it since 2017. I am surprised the 2018 ZR2 does not have the wiring for the heated wheel. I did it on my Z71 2018 and it works great. There are at least 2 other threads on here about it. If you read it all your questions will be answered.
 
#6 ·
Yes .. as discussed in the other threads .. the 2018 (no idea about the 2017 ) ZR2 does have all the wiring and connectors in place including the steering column connector. For some reason the ZR2 does not have the wire between X2 and X203 to complete the circuit and supply power to the heating element.
 
#7 ·
Did you have part numbers to the stock terminals? I know you said they were expensive through GM, but I am somewhat curious if I can figure something out. I looked at the wiring last night and couldn't find anything that would work.
 
#9 · (Edited)
I appreciate you posting those. I may bite the bullet and order them and mic them so we can figure something out...


On edit - I ordered those parts. Thankfully even with shipping it was still only $25. I would go to my local dealership, but getting them to give me anything below MSRP is like pulling teeth... I'll take some pictures of the terminals themselves and try to get some measurements as well.
 
#10 · (Edited)
Subscribed

Is there a "How To Install Heated Wheel" thread somewhere for the 2018 model or is it the same as the 2017 described in this section?

Thanks,
HH
 
#11 ·
Currently there are two, one in the interior section and one in the how-to section.
 
#12 · (Edited)
Any hints on getting the X203 wire seated all the way into the block? Does yours have this white piece of plastic on it?

My wire and connector were purchased from the dealership as one pre-made part and it will not go all the way into the block. The other wires look like they are seated all the way to the bottom as you can see the silver part of the connector on the back side of the block. This one will not go all the way in.

Image

Image


HH
 
  • Like
Reactions: Geo. A
#13 ·
Hey I feel bad I haven't had time to post my results but I have mine working too.

In regards to the X203, you can pry up the white connector a little bit and it will "unlock" the slots so you can slide the new one in. I didn't realize this until I had bent my connector either. It doesn't move up much but you'll notice that the connector slides in easily once it is up.
 
#14 ·
Hey I feel bad I haven't had time to post my results but I have mine working too.

In regards to the X203, you can pry up the white connector a little bit and it will "unlock" the slots so you can slide the new one in. I didn't realize this until I had bent my connector either. It doesn't move up much but you'll notice that the connector slides in easily once it is up.
From an online manual, the two parts that make up the connector are identified as the X203 Body Harness to Instrument Panel Harness with a description of 48-Way F 1.2 MCON, 2.8 MCP Series (BK)

That white locking piece is not moving.... everytime I try to pry it up, it distorts the shape of the white plastic lock so bad I'm concerned it will not fit back in the locking connector.

Any suggestions on how to get it unlocked without damaging it?

HH
 
#16 ·
Where did you get that shifter?? I like that.
 
#18 ·
I've read what appears to be all the threads on the Heated Wheel -

So I have a couple questions:

First, I have a 2018 ZR2, Gas, with the Jet Black interior.

Which wheel do I need?

Second, how can I tell if I have a 2 or 3 pin airbag?

Third, if I have a 3 pin, is that the same wheel as listed above, plus the 84235700 Clockspring?

Last (I think), do I just need the X2 and X203 jumpers to make power show up @ the wheel?

Oo... and last - which plugs are X2 and X203?

Thanks again,

Rich
 
#20 ·
Did my swap today - and it works!

Some observations:

When removing the Airbag from the Old wheel, and you can't get the stupid little latches to unlock with the allen wrench, and you've looked at the NEW wheel a dozen times.. Just take a razor knife, cut the back of the OLD wheel, so you can guide the allen wrench visually.

The airbag connectors have 2 little orange tabs. Lift them away from the airbag, and the connectors come right off...

The steering wheel bolt will come loose. It's a standard Righty Tighty/Lefty Loosey bolt.

There are 3 screws for the steering column shroud. One on the bottom, 2 behind the steering wheel. The top of the shroud pops off, then you can remove the bottom. You'll have to do this to replace the clock spring.

The airbag connector on the back of the clock spring has a RED lock. It doesn't want to come out, but it will, with just your hands/fingers. Then the connector comes out. You can take the old clock spring off, and then take the wires out of it after it's removed, so you're not pulling away from your body...

The new clock spring has an orange plastic pull tab. Don't pull it until AFTER you put the new wheel on.


Now, the wiring in the passenger footwell -

For the fusebox - just start removing connectors from the fusebox. Looking straight at it, there's one on the left, and one on the right. The one on the left is easier to remove if you pull the wire bundle down and out of the way. The fuse box is held in place with two plastic tabs - one on the lower side, and one on the front that you can't see (toward the passenger tire). They work the same way, require no tools to unlatch. Once you have it loose, the fusebox pulls straight out (from the wall in the direction of the drivers side). The plug you have to put a wire in, is on the BACK of the fusebox. (see other pictures above). Disconnect the plug from the fusebox, and set it aside. If you ordered the wires/leads using the GM parts listed above, this plug takes the LARGER pin. Use a screwdriver, and release the blue "face" on the front of the plug (there are 4 tabs). It doesn't have to move far, only 1-2 mm. That blue thing is the "lock" that holds all the pins in place. Once you line up your new pin, press it into place, then snap the blue "face" back. You're done. Connect the plug back to the fusebox, and reinstall the fusebox.

For the other plug, it's located in the same area, all the way down toward the floor. Slide the red tab, then "lever" the latch/lock. The plug you want to put the wire pulls "AFT" away from the passenger tire. If you ordered the pins listed above from GM/etc... it's the SMALLER one that fits here. This plug has a WHITE locking bar, and it only has to be released about 1 MM to allow the pin retention teeth to come out of the way. Once you identify which hole the pin goes in, try to insert it. Odds are, it's not going to go in all the way? Why? Because the GM pin/wire above is TOO BIG in diameter. Just remove the little metal collar that crimps around the wire insulation at the aft side of the pin...and that'll give you enough clearance. The pin does not need to be forced in place. If it doesn't wanna go, it's because the wire is bigger than designed for the hole. Make just a little room...not all the way through the plug...and it should work. Snap the white locking bar back down...and make sure the new pin is fastened. Reinstall the plug where you got it from, and splice your 2 new wires together. Congrats! You have 12 Volts @ your steering wheel now.

I did wiring first, then the wheel... took about an hour, because I wasn't in a hurry. I took zero photos, because there are plenty of good ones on here.
 
#21 ·
Hey richzr2, thanks for the additional information. Just to verify since I am going to take a stab at this too I just wanted to verify the P/N's you ordered.

For the '18 Colorado ZR2 (With 3 post airbag):

19301767 - X2 Wire
19329758 - X203 Wire
84488341 - Steering Wheel
84235700 - Coil


Thanks!
 
#23 ·
Snoddad - yes, mine is a 2018 ZR2 Gasoline powered. To verify if you have a 3 post airbag, turn your steering wheel upside down.... and just where the wheel meets the column, you can feel the "3rd post"...

JWeigel - yes, 2018 ZR2.


This is what I ordered from Tasco Parts:


Part Number Part Name Price Quantity
84488341 Wheel $203.18 1
84235700 Coil $66.69 1
19301767 Wire $13.86 1
19329758 Wire $5.88 1

Now, on the X2 wiring (19301767) , they sent me a 5 pack of the pins/wires... so I have 4 left if anyone wants one. PM me your address, and I'll put it in the mail to you.
 
#25 ·
This is what I ordered from Tasco Parts:


Part Number Part Name Price Quantity
84488341 Wheel $203.18 1
84235700 Coil $66.69 1
19301767 Wire $13.86 1
19329758 Wire $5.88 1

Now, on the X2 wiring (19301767) , they sent me a 5 pack of the pins/wires... so I have 4 left if anyone wants one. PM me your address, and I'll put it in the mail to you.

PM Sent!


Awesome thread! I'm picking up my truck tomorrow and hope to get the steering wheel project complete between the holidays.
 
#24 ·
Thanks richzr2 for the P/N confirmation. I went ahead with the order with the wires. I am sure other people here will take you up on them. When I get the parts in I'll take some more pictures for everyone to see on getting it installed. Here are my notes so far:

My truck had a build date of 03/18 and has the 3 post air bag. When you are taking off the top cover of the wheel column it helps to pull the wheel fully out towards the seat and all the way down. The wiper arm is a PITA when taking the cover off but it does come off as others here noted without breaking anything. Also a quick way to see if you have a 2 or 3 post for sure is use the front camera on your phone and stick it down and move the wheel and see the back of the wheel (will also help seeing the clips to the air bag posts when removing the air bag.)

Now the wait for the parts!!!
 
#28 ·
Hi dmhines, Your post is great. I have a 2018 ZR2 which I purchased back in January last year in '18. It does have the stock sport bar and lighting. Don't know which air bag I have....three pin???? but as far as the electrical connections go , I'm assuming all is done under the hood fuse box area? And as far as the steering wheel goes I need a complete wheel AND air bag CLOCK spring....NOT the bag itself, right? I would like to do this this summer Thanks, George
 
#29 ·
Geo.A, I also successfully updated to the heated wheel in my 2018 ZR2 so I may be able to help as well. As you know the first thing to check, is if your truck has a 2 pin airbag design or the newer 3 pin design. I posted a picture here that shows my airbag removed and sitting on top of the wheel. You can see that this airbag has 3 pins that would engage the 3 holes in the wheel. All you need to do to verify which airbag you have (without removing it), is to rotate your steering wheel so the bottom is now up at 12:00. Then using a mirror and light, look between the backside of the wheel and the column shroud. If you see a pin, you have the 3 pin design. if no pin, its the older 2 pin design. As far as wiring, its all done inside the truck at the passenger side kick panel fuse box.
For some reason my photo got rotated 90 degrees to the right, ugh!
 

Attachments

#30 ·
Thanks G92Z28, So let me get this straight.....All the wiring is done inside by the passenger footwell. I see the fusebox cover. And the jumper that I need to install is the same regardless of which type Air Bag I have...correct? The last airbag I did was on my 2005 Astro. Next Question:: I NEED to determine if I have a two or three pin Bag because that will tell me which new wheel and clock spring I need to purchase??? Or is there another reason??and I NEED to purchase both, correct?? Also do I need to wait a while for any capacitor to discharge before I disconnect the Air Bag?? That's what someone told me long ago on my Astro. BTW Thanks so very much for your reply. I plan on doing this this summer, as you can see I already spent quite a bit of money and need to wait a bit or I'll be in the "dog house" lol.

Thanks, George
 
#32 ·
Thanks G92Z28, So let me get this straight.....All the wiring is done inside by the passenger footwell. I see the fusebox cover. And the jumper that I need to install is the same regardless of which type Air Bag I have...correct? The last airbag I did was on my 2005 Astro. Next Question:: I NEED to determine if I have a two or three pin Bag because that will tell me which new wheel and clock spring I need to purchase??? Or is there another reason??and I NEED to purchase both, correct?? Also do I need to wait a while for any capacitor to discharge before I disconnect the Air Bag?? That's what someone told me long ago on my Astro. BTW Thanks so very much for your reply. I plan on doing this this summer, as you can see I already spent quite a bit of money and need to wait a bit or I'll be in the "dog house" lol.

Thanks, George
George you really need to verify which airbag design you have before thinking about doing this swap. I say this because earlier you stated that you bought your truck in Jan. 2018. I suspect that your truck was built in late 2017. If it was, you may have the 2 pin airbag and you wont be able to upgrade without also buying a new 3 pin airbag (big bucks!). So take a look as noted earlier, to see which airbag you have.
 
#31 ·
BTW would anyone know what the part number is for the wheel if I have the two (2) pin air bag ?
Also is the clockspring the same for both styles ?

Thanks,
George
 
#41 ·
You're absolutely right. I live in Minnesota which is having blizzard warnings today and its nice to preheat the wheel. But the main reason I did it and maybe some others as well, is that its an easy mod to make on our trucks. I love being able to work on a new truck and make it better with each modification. For me its a hobby just the same as working on my older collector cars.
 
#43 ·
Update !!!

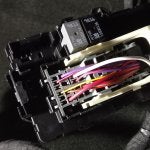
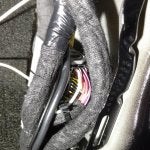
Hello again.....Just completed phase I of my project. So far so good. In pic 1 is the X2 wire n place and pic 2 is the X203 wire in place, which I secured it to the harness(loom) with a zip tie. The X2 wire is seen in image 2 in the upper left corner. I will post another update after the wheel install, though it might be a few weeks. I know it may seem a bit redundant but more pics at different viewpoints might be beneficial to future members doing this modification.
 

Attachments

  • Like
Reactions: G92Z28
#44 ·
Hello again.....Just completed phase I of my project. So far so good. In pic 1 is the X2 wire n place and pic 2 is the X203 wire in place, which I secured it to the harness(loom) with a zip tie. The X2 wire is seen in image 2 in the upper left corner. I will post another update after the wheel install, though it might be a few weeks. I know it may seem a bit redundant but more pics at different viewpoints might be beneficial to future members doing this modification.
You just completed the most difficult phase. I had a little trouble doing this part. I ended up having to do it twice before the connectors would "click" into pace. The rest of the swap is a breeze, just remove and replace. Good job.