Hello all, been lurking a bit since I bought my Canyon this summer. 2016 Canyon with the 2.8L Duramax. I absolutely love the truck but the first owner ordered it with no block heater. I live in Fargo, ND where it do be cold at times so I want one. It was previously a South Dakota truck so I am at a loss for why he wouldn't pay for the block heater option. Idiotic if you ask me since I've heard it was a $75 option. The block heater and cord combined cost me roughly $160, and I was able to order the cord with no thermostat built in. There are two cords, one with a thermostat that doesn't run until the temp is below 0, and one with no thermostat. I want to be able to run mine on a timer even if the temp is 0-20 really, just to save wear on the engine and warm up time. This may be the poorest writeup since I have only a few pictures and mostly just description, but since I couldn't find any threads where it seemed like someone had actually attempted to install one I figured I'd give what info I have.
Can you do it?: This is certainly not an easy job, not that it is overly technical, just a very hard spot to work in the wheel well of the truck. Also I have average sized hands and I could barely reach behind the starter to work with one hand. I would say it took me 4 or 5 hours to do mostly because I had trouble removing the plug in the block, and because some steps are very difficult with one hand and when you can't see what you are touching. I heard talk of the dealer charging $350 or so, which seemed fair after I did one. So if you dont enjoy working on stuff then have them do it and eat the cost.
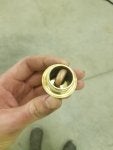
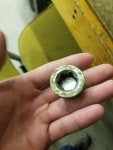
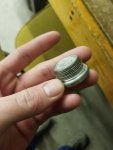
Supplies: Besides the block heater element, cord with or without thermostat, and basic hand tools the only specialized tools were a 17mm allen head socket for removing the block core plug and a torx bit for removing the screws for the inner fender liner. I dont exactly remember what T size though. Another thread had a guy claim he had installed one and he said 19mm. 17mm was perfect on mine so not sure if he was confused about which engine the thread was about or just misremembered. I bought a set of allen heads that included 17 and 19 for this reason at Harbor Freight for $30. It will also be necessary to have extensions (1/2 inch drive preferrably) that total at least 12" or so. I used three extensions stacked but one is always better. You'll also need a gallon of 50/50 dexcool to refill after the block drains, exactly one gallon which is convenient.
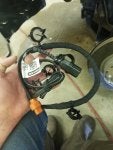
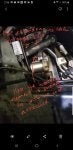
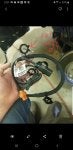
The process: jack up the drivers side as high as you feel safe, as you'll be working inside the wheel well and the extra height will save your back. Remove the front wheel and then the inner fender liner. Have a drill or impact set up with a torx bit for this as there are a lot of screws (14ish?). If you've ever had your truck at a dealer for service where this piece was removed then you are definitely missing some of the bolts, no sweat I was missing 3 or 4. The inner fender liner comes right out at this point but be sure none of the clip nuts (the piece the torx screws screw into) fall out and get lost. I took this opportunity to spray down the engine around the plug with water to make sure no debris would work its way into the coolant passages while I do this job. Also a good time to wash down inside the fender, frame rail, and on top of the lower control arm where sand will work its way and build up in the midwest. Now locate the plug in the engine block that you will remove and replace with the block heater. It is directly above the starter behind two stainless transmission lines. Those lines are a pain to work around, and maybe someone with more confidence would just remove them, as there is a disconnect 6" behind the project area. I didn't know what that would entail so I left them hooked up. On these lines there are three brackets that need to be disconnected to allow them to move a bit. The first, and closest to the frame rail, is just a black plastic piece with a ribbed point that sticks into a metal bracket. Pry the ribbed piece out and it's free. Following those lines forward toward the front of the truck there is a stud with a nut holding the lines on a metal bracket, remove the nut with a 15mm deep well socket, standard sockets bottom out on the stud. At this point be sure to put on rubber gloves because you will need to work near some hoses and wires with protective jackets that really gave my hand a bad rash. Keep following the lines and you will see another metal bracket, this one with a bolt head with the head facing down toward the ground. It can only be seen from an odd angle through the hoses and wires, and can only be reached with the box end of a 15mm wrench. It takes forever to back the bolt out since it is at least 2" long. It can help to screw out by hand if you push/pull on the trans lines so that there isn't tension holding it in. This is all that I moved for the whole project, but I contemplated taking the starter out too, it would have helped some I think. Now that the lines are free (there are flex pieces on each side of our project area) pull the bracket off that stud that we pulled the nut off of and move the bracket towards the rear of the truck as much as possible. The plug for the block heater is located directly above that stud, and moving the bracket gives you just enough room to see and work back there. Snake your extension with the 17mm through two of the rubber hoses and get it mated with that plug. It's a good idea to visually verify that the plug isnt full of dirt and stuff that would prevent the allen head from fully seating inside or contaminating the coolant passages. You want the allen head as deep into the plug as possible because if you strip it you are SOL brother. It can be deceptive since the 17mm fits very snug. I actually tapped on the end of the extensions to make sure it fully seated. The reason for the long extensions is so you can extend beyond the frame rail to get a breaker bar on and be able to turn it. I was able to finally break mine free by laying on a creeper with my breaker bar hanging vertically and crank on it. It wasn't horribly tight but getting an angle on it is difficult. I also sprayed mine a couple times with pb blaster and let it sit for 20 minutes or so. Have a big drain pan ready as coolant will run out fast and splash around. It runs down different components and spreads out so expect a mess and have a big pan (maybe some cardboard too). Mine drained a gallon almost exactly. Now get your block heater element. It comes from gm with some white sealant painted on and so I didn't use any additional sealants. Using my left hand I was able to fish it up past the starter and get it threaded into the hole. It took some time to get started as you can't seeup there at all with your hand up there too. Just make sure not to cross thread it, you should be able to feel if it turns ok. The heater element has a hex on the back so I was able to reach through the two hoses again and tighten it in with I believe a 24mm socket. It seemed to bottom out before it got crazy tight, and I don't believe it would be necessary to reef on it anyway. Now plugging in the cord. GM somehow managed to engineer a cord short enough that it can't be run in any convenient spot. It's just too short for every good location. I finally settled on running it out beneath the recovery hook on the drivers side front bumper. There's just a small piece of foam behind that that the cord can slip under. I cut off the round plastic clips that come on the cord as they made it hard to fish through small spots. Fish the little heater element end through stuff rather than trying to fish the big plug end through like me. It only plugs in one way, so get a look at the orientation of the pins, then fish your hand and the cord up through and try plug it in for 45 minutes or so. Make sure it fully plugs in and bottoms out, there is some friction to it. Zip tie the cord to your chosen destination being sure to keep it away from moving parts or anything that wil get very hot, I had to make sure to avoid the steering shaft with my chosen spot so it didn't get wedged beside it when I turn. Once the cord is secure it's time to put the stainless lines back in place. Start with the plastic bracket, it should push right back in place. Then get the nect bracket over the stud and start the nut, don't tighten it yet though. Now get the bolt started for the final bracket. You may drop it a hundred times but it can be started. It takes forever but I did get it. You may not be able to get the bolt in and it's not the end of the world. It just means you're a lesser man than I and that females in our general area will see that I am the superior mate. It actually looks like it really wouldnt matter if that bolt made it back in there, but I dont know that. Once the bolt is back in tighten down the nut on the stud, replace the fender liner, and torque the wheel back on.
Finishing up: Now fill the overflow tank back up. The tank on this motor is a genius design where a hose runs straight to the engine, so when you fill the overflow tank it will slowly drink it right into the motor. Just fill, wait while it glugs, and fill some more. In the end I had it filled about an inch above the full line after my gallon, but now that I have ran it some it has settled back down to around full. I can't report any leaks yet.
Conclusion: Sorry I lack many photos or video, it wouldn't have been much help anyway as you can't get a look at anything. It's mostly feel back there. I firmly believe if you are opting out of a $75 block heater when building a new truck then you probably can't afford a new truck...Best of luck and ask away if you have any questions.
Can you do it?: This is certainly not an easy job, not that it is overly technical, just a very hard spot to work in the wheel well of the truck. Also I have average sized hands and I could barely reach behind the starter to work with one hand. I would say it took me 4 or 5 hours to do mostly because I had trouble removing the plug in the block, and because some steps are very difficult with one hand and when you can't see what you are touching. I heard talk of the dealer charging $350 or so, which seemed fair after I did one. So if you dont enjoy working on stuff then have them do it and eat the cost.
Supplies: Besides the block heater element, cord with or without thermostat, and basic hand tools the only specialized tools were a 17mm allen head socket for removing the block core plug and a torx bit for removing the screws for the inner fender liner. I dont exactly remember what T size though. Another thread had a guy claim he had installed one and he said 19mm. 17mm was perfect on mine so not sure if he was confused about which engine the thread was about or just misremembered. I bought a set of allen heads that included 17 and 19 for this reason at Harbor Freight for $30. It will also be necessary to have extensions (1/2 inch drive preferrably) that total at least 12" or so. I used three extensions stacked but one is always better. You'll also need a gallon of 50/50 dexcool to refill after the block drains, exactly one gallon which is convenient.
The process: jack up the drivers side as high as you feel safe, as you'll be working inside the wheel well and the extra height will save your back. Remove the front wheel and then the inner fender liner. Have a drill or impact set up with a torx bit for this as there are a lot of screws (14ish?). If you've ever had your truck at a dealer for service where this piece was removed then you are definitely missing some of the bolts, no sweat I was missing 3 or 4. The inner fender liner comes right out at this point but be sure none of the clip nuts (the piece the torx screws screw into) fall out and get lost. I took this opportunity to spray down the engine around the plug with water to make sure no debris would work its way into the coolant passages while I do this job. Also a good time to wash down inside the fender, frame rail, and on top of the lower control arm where sand will work its way and build up in the midwest. Now locate the plug in the engine block that you will remove and replace with the block heater. It is directly above the starter behind two stainless transmission lines. Those lines are a pain to work around, and maybe someone with more confidence would just remove them, as there is a disconnect 6" behind the project area. I didn't know what that would entail so I left them hooked up. On these lines there are three brackets that need to be disconnected to allow them to move a bit. The first, and closest to the frame rail, is just a black plastic piece with a ribbed point that sticks into a metal bracket. Pry the ribbed piece out and it's free. Following those lines forward toward the front of the truck there is a stud with a nut holding the lines on a metal bracket, remove the nut with a 15mm deep well socket, standard sockets bottom out on the stud. At this point be sure to put on rubber gloves because you will need to work near some hoses and wires with protective jackets that really gave my hand a bad rash. Keep following the lines and you will see another metal bracket, this one with a bolt head with the head facing down toward the ground. It can only be seen from an odd angle through the hoses and wires, and can only be reached with the box end of a 15mm wrench. It takes forever to back the bolt out since it is at least 2" long. It can help to screw out by hand if you push/pull on the trans lines so that there isn't tension holding it in. This is all that I moved for the whole project, but I contemplated taking the starter out too, it would have helped some I think. Now that the lines are free (there are flex pieces on each side of our project area) pull the bracket off that stud that we pulled the nut off of and move the bracket towards the rear of the truck as much as possible. The plug for the block heater is located directly above that stud, and moving the bracket gives you just enough room to see and work back there. Snake your extension with the 17mm through two of the rubber hoses and get it mated with that plug. It's a good idea to visually verify that the plug isnt full of dirt and stuff that would prevent the allen head from fully seating inside or contaminating the coolant passages. You want the allen head as deep into the plug as possible because if you strip it you are SOL brother. It can be deceptive since the 17mm fits very snug. I actually tapped on the end of the extensions to make sure it fully seated. The reason for the long extensions is so you can extend beyond the frame rail to get a breaker bar on and be able to turn it. I was able to finally break mine free by laying on a creeper with my breaker bar hanging vertically and crank on it. It wasn't horribly tight but getting an angle on it is difficult. I also sprayed mine a couple times with pb blaster and let it sit for 20 minutes or so. Have a big drain pan ready as coolant will run out fast and splash around. It runs down different components and spreads out so expect a mess and have a big pan (maybe some cardboard too). Mine drained a gallon almost exactly. Now get your block heater element. It comes from gm with some white sealant painted on and so I didn't use any additional sealants. Using my left hand I was able to fish it up past the starter and get it threaded into the hole. It took some time to get started as you can't seeup there at all with your hand up there too. Just make sure not to cross thread it, you should be able to feel if it turns ok. The heater element has a hex on the back so I was able to reach through the two hoses again and tighten it in with I believe a 24mm socket. It seemed to bottom out before it got crazy tight, and I don't believe it would be necessary to reef on it anyway. Now plugging in the cord. GM somehow managed to engineer a cord short enough that it can't be run in any convenient spot. It's just too short for every good location. I finally settled on running it out beneath the recovery hook on the drivers side front bumper. There's just a small piece of foam behind that that the cord can slip under. I cut off the round plastic clips that come on the cord as they made it hard to fish through small spots. Fish the little heater element end through stuff rather than trying to fish the big plug end through like me. It only plugs in one way, so get a look at the orientation of the pins, then fish your hand and the cord up through and try plug it in for 45 minutes or so. Make sure it fully plugs in and bottoms out, there is some friction to it. Zip tie the cord to your chosen destination being sure to keep it away from moving parts or anything that wil get very hot, I had to make sure to avoid the steering shaft with my chosen spot so it didn't get wedged beside it when I turn. Once the cord is secure it's time to put the stainless lines back in place. Start with the plastic bracket, it should push right back in place. Then get the nect bracket over the stud and start the nut, don't tighten it yet though. Now get the bolt started for the final bracket. You may drop it a hundred times but it can be started. It takes forever but I did get it. You may not be able to get the bolt in and it's not the end of the world. It just means you're a lesser man than I and that females in our general area will see that I am the superior mate. It actually looks like it really wouldnt matter if that bolt made it back in there, but I dont know that. Once the bolt is back in tighten down the nut on the stud, replace the fender liner, and torque the wheel back on.
Finishing up: Now fill the overflow tank back up. The tank on this motor is a genius design where a hose runs straight to the engine, so when you fill the overflow tank it will slowly drink it right into the motor. Just fill, wait while it glugs, and fill some more. In the end I had it filled about an inch above the full line after my gallon, but now that I have ran it some it has settled back down to around full. I can't report any leaks yet.
Conclusion: Sorry I lack many photos or video, it wouldn't have been much help anyway as you can't get a look at anything. It's mostly feel back there. I firmly believe if you are opting out of a $75 block heater when building a new truck then you probably can't afford a new truck...Best of luck and ask away if you have any questions.