Chevy Colorado & GMC Canyon banner
21 - 40 of 238 Posts
Discussion starter · #21 · (Edited)
Awesome set up. Had a very similar set up in my previous truck ([emoji895]). Looking to do the same with my zr2. We should go on a Coues hunt in AZ sometime! How long is the awning ?
Coues in AZ is on my list, let's do it. The awning is the ARB 2000 which is, iirc, 6.5' long/wide and 8' extension.
 
Discussion starter · #23 ·
I did a bunch of small-ish things to the truck in December. First, I installed the Chevrolet fender flares. Pretty straightforward installation and I really like how they "beef up" the truck's appearance:

Image


Image


One of the things I missed most from my 4Runner was having a Homelink garage door opener. I found a GM Homelink auto-dimming mirror on eBay and ordered it. It was plug-n-play as advertised, the only hard part was getting the damn plastic cover back in place. If not for fighting with that, this would have been a five minute job. Works as advertised!

Image


Finally, I ordered up and installed an AEV rear differential skid plate. It seems really well made and was very easy to install.

Image


I also finally got to go out for an overnight camping trip to Big Bear to help a buddy with a late season deer hunt in early November. He was not successful, but it was great to get out and camp in the truck.

Image


Image


Image


The orange was because he was archery hunting during rifle season. We don't have to wear orange in California, but during rifle season I won't go out without it.
 
Discussion starter · #24 ·
January was a huge month for the truck. First, I finally, with a lot of help from a friend, installed my Trigger4 Plus along with the ditch lights and rear rack lights. I chose the Trigger4 Plus for a few reasons. One, it's a Bluetooth controller so you don't have to run any wires through the firewall. It also can be controlled from an app on your phone so you can dim the lights and make them flash. Fun. Finally, it's a lot cheaper than an sPod.

I mounted the controller to a Power Trays plate.
Image


At some point, I will pull the tray out and cut a hole where the Adventure Wired sticker is and run the wires under the plate.

The switches are mounted in a 3D printed holder where the sunglass holder used to be. My switches are for 1. Compressor, 2. Ditch lights, 3. Rear chase light, and 4. Rear reverse light.

Image


My ditch lights are @BajaDesigns Squadron Pro's with the combo lens. I would have gone with clear lenses but I bought them from a guy here on the forum and he must have used red Loctite on the cover screws so I can't get them out to swap the lens. :ROFLMAO:

Image


The passenger side rear light is my "chase" light. It's a Baja Designs S2 Sport with a yellow lens. The driver's side is also an S2 Sport and is a clear lens to assist with backing up in the dark. (This picture is before I swapped the passenger side lens to a yellow one.)
Image
 
Discussion starter · #25 · (Edited)
Then, I saw a post on here by @oxidizr that he was selling his Bison wheels. A short negotiation was had in which I agreed to pay his full asking price 🤣 and I met up with him to pick up the wheels. Oxidzr is a really nice guy with a ton of knowledge. I look forward to hitting some trails with him in the very near future!

Image


I took them to Discount Tire to have my TPMS sensors swapped over and to have the wheels wrapped in BFG KO2's in 255/75/R17. I prefer a thinner wheel than seems to be the style today and these are C load tires so they're a bit softer and lighter than my E Load Nitto Ridge Grapplers on the 4Runner.

Image


Image


Image


And yes, a 32" spare tire fits easily. I would be willing to bet a 33" tire can be stuffed in there since there seems to be plenty of room.

Finally, my wife bought me an AEV Bison snorkel for my birthday. I considered installing it myself, but then I realized that would be stupid and had my friend do it at his shop.

Image


Image


Image


I finally got to get out for a long weekend and went Jackrabbit hunting with a Marine buddy. It was very cold and rained Friday night and snowed Saturday night so I was really happy to have my awning and the LED light strip in it was really nice.

Image


Image


Image


My buddy, Kevin:

Image


Image


One of Kevin's Marine brothers that he went into Iraq with came out from Las Vegas Saturday late afternoon and hung out with us. He brought some good Bourbon which was nice of him. We didn't see a single Jackrabbit the entire weekend, but we did get a lot of target shooting in which was a blast. And yes, we did police all of our brass and shot shells and left our campsite better than we found it.

Saturday night it got down to 19° and I froze my assets off. All I had was a 30° sleeping bag and my Woobie. Fortunately, I keep a box of handwarmers in my truck, so four of those were thrown in my sleeping bag and I survived the night. I have since picked up a heavy military surplus wool blanket which will make things much more comfortable.

Image


Image


The only problem was that now my passenger side ditch light was hitting the snorkel so I couldn't open the hood all the way. A quick call to CBI had a set of their brackets to me the next day. I swapped the lights over to the CBI brackets and all is good.

Image


ALL THE LUMENS!!

Image
 
Discussion starter · #28 ·
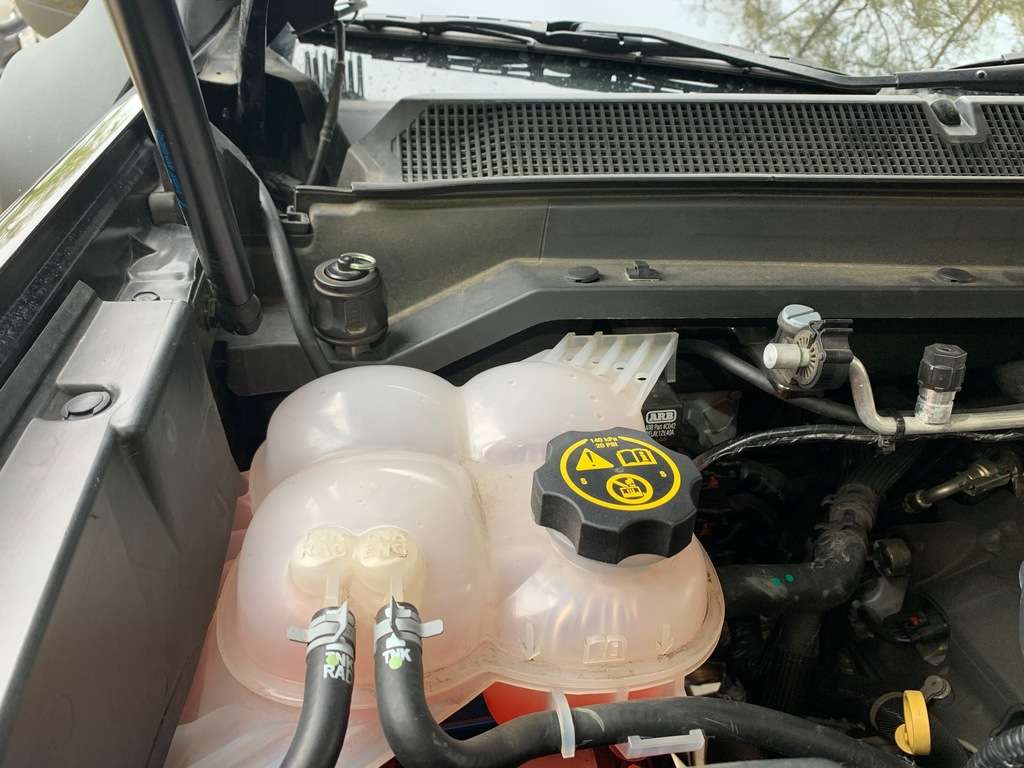
I just realized I never covered the air compressor installation. I had an ARB single compressor in my 4Runner on a homemade mounting plate. I removed it when I gave the 4Runner to my daughter and it was sitting around in the garage. I found @larson328 's great thread and video on installing the ARB in our trucks and set to it. LINK I bought a 589 Fabrication mounting plate and mounted the compressor under the coolant overflow tank. Installation was very straightforward using 589's instructions. Just remove the airbox, move the coolant overflow tank aside, install the compressor on the plate, mount the plate in the truck, replace the overflow tank (somewhat of a pain in the ass), and then re-install the air box. Only tools needed were a phillips screwdriver and a 10mm socket wrench with a couple of extensions.

Image


Image


One thing I really didn't like was how difficult it was to attach my hose to the compressor. to fix it, I removed the airbox and overflow tank again, and installed a flexible hose extender (parts list is in the thread linked above). Now the air chuck is very easy to access.

Image


Image

(I just realized that in this picture the nuts are not on the coolant overflow reservoir and the ARB solenoid is just dangling there. I put everything back together before buttoning up.)

Much better! It's wired into my Trigger 4 Plus and works great.

One lesson learned from this: Don't switch on your ignition with the MAF sensor disconnected (part of removing the air box). I turned on the ignition to check the extension for leaks while the MAF was disconnected. Got a CEL for my efforts. I also got an email from GM to take my truck in for service, crazy. Luckily, I have a code reader so I just cleared the code and everyone is happy again.
 
Discussion starter · #29 ·
Couple of small things. First, I made a mount for my tablet. I bought a Vehicle Specific Mount from ProFit: LINK

Image


Originally, I had it hooked up with a RAM ball mount on the swivel. However, that was too long and the tablet was bouncing everywhere. So I cut the swivel mount off, drilled a hole and mounted a RAM ball on the much shorter arm.

Image


Then I re=installed it per ProFit's instructions:


Image


Almost perfect! I used a RAM short arm and an X-grip and it holds my iPad Mini right where I want it. The tablet does still bounce a little bit on really rough off road, but it isn't going anywhere.

Image


Also, when I installed the Bison wheels with the larger tires, my speedometer was off by 2-3 mph which bugged me. After some quick research on the forum, I bought the Rough Country Inline Speedometer Calibrator. LINK It says it's only for 2017-2018, but when you go to install the latest software, it offers up to 2019 and I can verify it works perfectly on my 2020. I checked it against Waze and my Garmin Montana GPS. Very easy install too.

Image
 
Discussion starter · #30 ·
Added a little piece of mind and added a spare lock. The lock goes in the opening where the rod would go to lower your spare. It was a little pricey, but when I thought about how much it would cost me to replace my spare wheel and tire it seemed like a good idea. LINK

Image
 
Discussion starter · #32 ·
Nice idea!!
I could see this being a really good mod for the Zr2/bison guys too as they have high priced wheels off the lot.
Totally. When my wife balked at the $50, I explained to her that my wheel and tire are worth about 16 times what the lock costs. Maybe more?

When I finally get a hitch carrier for the spare tire it will become useless, but for now . . .
 
Discussion starter · #33 ·
This past weekend, I took a three day weekend to head out to the desert with my hunting club to camp out and do some long(er) range shooting. The camping set up worked great except that it was too windy all weekend to use the awning. The wind also made long range shooting a bit tough but it was good to practice calling winds at 400+ yards. One nice thing about my set-up is that it's pretty easy to undo the topper tent when you want to do things like drive over to the shooting area.

I also got to test the suspension at high speed in washboards and whoops and it passed with flying colors. A friend and I were driving back to camp from the shooting area and when I tried to pass him he punched it. I was passing him at about 80 mph when I suddenly noticed a rut/drop-off right in my passenger side tire's path. I puckered up for what I suspected was going to be an "interesting" moment but the suspension just soaked it up and I barely even noticed it. Nice!!

Camp:
Image

The trucks out at the shooting area
Image

Me shooting the Henry at a 150 yard target and testing some new handloads:
Image

The guy with the pistol on the sticks is shooting his 40 at the same 150 yard target. He hit it 3 of 5 shots!
Image

A few of us in the group are Marines and one of them brought these for all of us:
Image

Image

Campfire. This is what happens when one of your members owns a tree trimming business, you get giant Eucalyptus logs :ROFLMAO:
Image

And last, Savanna waiting for me to get my buzzed ass to bed
Image


All in all a great trip and everything worked as hoped. Can't wait til the next one.
YUT! Good **** brother. I have a Marlin that looks just like that Henry! Mine is in the only government I trust though. 45/70 (read that in hickok45's voice).
 
Discussion starter · #35 ·
YUT! Good **** brother. I have a Marlin that looks just like that Henry! Mine is in the only government I trust though. 45/70 (read that in hickok45's voice).
45-70 is the way. If you only have one lever action, 45-70 is the way to go.
 
Discussion starter · #36 ·
First, I installed my AEV Transfer Case Skid Plate. Although the instructions said I would need to drill 4 holes in the frame, they were already there which was really nice. Maybe Chevy started pre-drilling the holes on the 2020's? A floor jack made it an easy one man job. AEV included a bunch of extra hardware for some reason.
Image

See @WV NATIVE I do have the same floor jack.
Image

Image


Then I installed the Colorado/Canyon Enthusiasts "waffle" replacements and the Rough Country Tow Hook to Shackle Conversion kit. LINK More tire clearance and shackles are a good thing!
Image
 
See @WV NATIVE I do have the same floor jack.
Glad to see you're putting it to work. (y) Can't go wrong with undercarriage protection. Way more important than the other stuff most people want to bolt on their trucks. You can't typically see skids so they don't have social media appeal.
 
Discussion starter · #38 ·
Today I played hooky from work and installed my AEV Transmission Skid. It was both very simple and very difficult. There is next to NO access for some of the nuts, I think AEV could have come up with better way to bolt things up. That said, everything fit perfectly and looks VERY solid. First the picture, then the details of the install.
Image


So here is how I was able to install the transmission skid. I already had the transfer case skid installed.

1. Install the front plate that goes under the engine skid plate. Leave all bolts loose.
2. Drop the transfer case skid plate. I used a floor jack to control it.
3. Attach the transmission skid plate tubes to the transfer case skid plate, straighten the tubes so they're pointing in the right direction and tighten them down. (You will never be able to get a wrench in there once the transfer case skid is back in place.)
4.Re-install the transfer case skid plate. Make sure you drop the second J-bolt into the frame at least once so you have start over again. Then re-install for the second time, this time being VERY careful not to drop the J-bolt into the frame. Leave all the bolts loose so the skid plate can shift a wee bit.
5. Attach the fronts of the transmission skid plate tubes to the adapter plate. Attached them all loosely, then tighten those down working from one side to the other. This will suck. You will get through it. Your neck and shoulders will hate you. FAFO.
6. Tighten up the three engine skid plate bolts.
7. Tighten up the transfer case skid plate bolts.
8. Go drink a beer, smoke a fatty (if that's legal in your state), or do whatever you do to relax and celebrate a job well done.

I wish I had one of those horizontal ratchet wrenches like THIS. Would have made this job a LOT easier.

If you have any questions, fire away!
 
It looks like they supplied carriage bolts?
whatta pain in the a

I know there’s a place for them but I may have swapped them out for standard bolts with protectors if possible. It looks like all the turning happened from above?
 
Discussion starter · #40 ·
It looks like they supplied carriage bolts?
whatta pain in the a

I know there’s a place for them but I may have swapped them out for standard bolts with protectors if possible. It looks like all the turning happened from above?
Exactly. Whoever at AEV designed that should be taken out back and flogged. Carriage bolts are stupid for this application.

If I had known this ahead of time, I might have done what you suggested and gone to the hardware store for some Grade 8 stainless bolts. It would be very easy to hold the nut stationary from above and then screw a bolt in. I wonder why AEV didn't do it that way. Potentially, they were concerned the bolt shoulders might get beat up by actual use, but you could easily use an hex-head bolt if that was the concern. No way in hell I'm going in there and replacing the nuts and bolts, but if I ever have to remove the "skid plate" for any reason, I will replace the bolts.
 
21 - 40 of 238 Posts